How to use the SKF TKSA 11 Alignment Tool
Ensuring your shaft is correctly aligned keeps your machine working at it's optimum level by preventing components from working at a decreased capacity while consuming more power.
Follow Bearing Product Manager, Andy Fletcher as he explains how to use the SKF TKSA 11 Alightment Tool & related app to align shafts.
VIDEO TRANSCRIPT
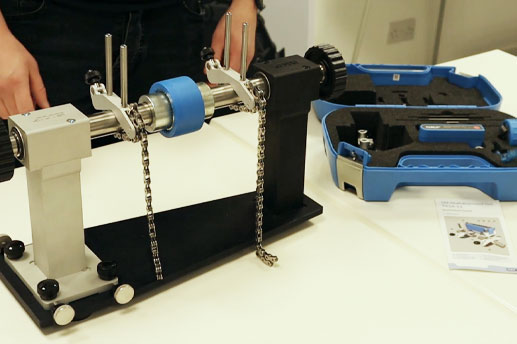
"Hello, I'm here today to talk you through the TKSA 11 shaft alginment tool. I'm going to show you how to correctly use and prepare the device. This is the kit, and I'll be showing you how to use the device and the software that goes with it. With the laser head, magnetic base, mounting brackets, it's designed to be a quick and easy way of aligning shafts correctly.
So, the first thing to do is to fit the mounting brackets, you just need to make sure that the rods correctly located in the v bracket as it sits on the the shaft, and the chain goes around the base of the shaft. the pin in the bracket locates in the chain and then you can just tighten the nut up to locate it all in position, Then, we do the same on the other side. So, this is on top of the shaft, pin in the bracket, goes through the chain link and then it's just a case of tightening it back up.
It's always a good idea to make sure that they're just as aligned as possible, just check by eye to make life a lttle bit easier in the future. So, then put the magnetic base on, it just slides down. It needs to be just above the centre height of the coupling. Then we put a reference bar on, this is what's going to record the measurement along with the laser device. This [the laser device] is exactly the same, it just slides on. Let's leave it just above the bar for now, as the software will tell you how close it needs to be.
Now, switch the device on and then load up the app. the software tells you which features need to be measured in which order. So, the first one is the centre distance of the coupling to the bracket, the side of the motor which in this 85mm so I'll change that. Next one is the distance from the back bracket to the first motor mounting position, 55mm which it already is. Then between the motor mounting positions. So, we are all set on that, you can set the machine ID, you can set the tolerance, it's all very self explanatory.
Click done and the motor vanishes off and gives you a side on profile view. The green highlighted arrow is where it needs to be rotated to, so in this instance, once it's in position it asks you to record, and rotate up again to the next position, when it goes green, record. Into the final position, record again. So this gives me my set of initial measurements. As you can see, we've got one tick in green and three other factors that are out. So, I want to align the device.
At this point, it's showing me that I need to add shims to those positions, which I would do, remove or add, whichever it is. I would say shimming done; if this was out of alignment, it would tell me and there would be values there to move backwards and forwards. You're then given the option to repeat he measurement again. When you repeat the measurement, that'll then confirm if what you aligning is correct or not.
It would then give me all ticks, click done and it would then create me a report of the before and after showing the differences. I can then share this however I wanted."
Get in touch with the team to discuss how Acorn can help your maintenace requirements.